

Solar Panel Installation Process
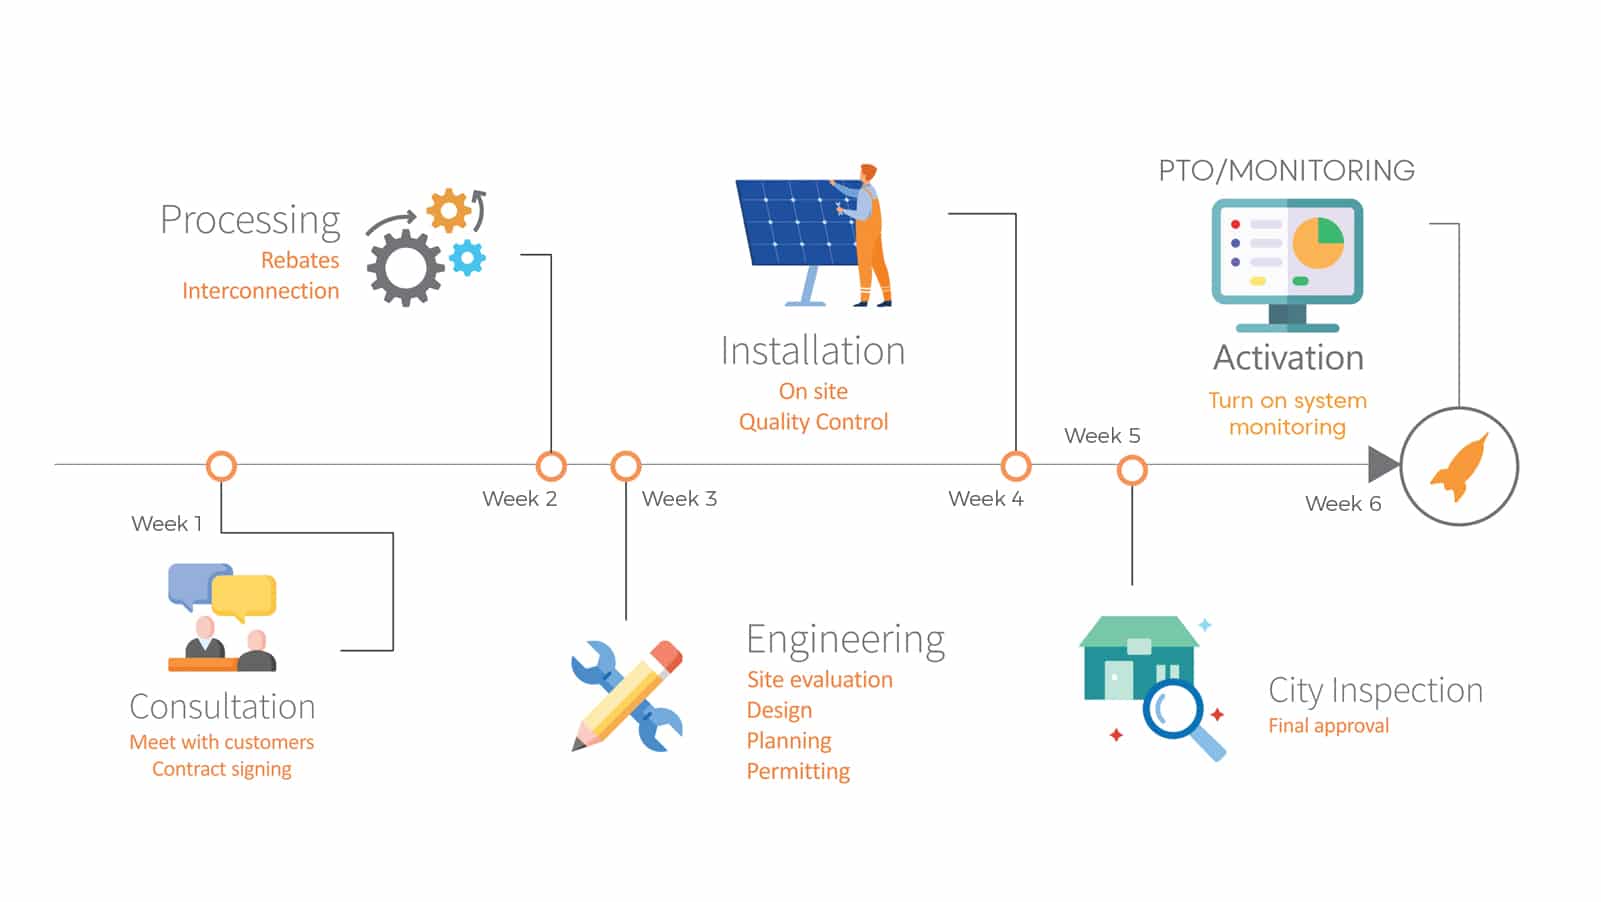
LA Solar Group does its best to provide a quick, smooth and quality solar panel installation process. Most installations with LA Solar Group consist of the following steps:
- Measurement and Layout: The installation area is measured per design, and the layout of the panels and roof mounts is marked on the roof.
- Remove Tiles (if tile roof): The installers remove tiles to locate roof mounts.
- Locate Rafters: Then the installers locate roof-mounted rafters using various methods (including audibly, electronically, or physically).
- Install Roof Mounts: The installers fasten the roof mounts into the rafters to ensure proper installation and water seal. Enough roof mounts are applicable to reduce load and stress on each rafter while preventing too many to minimize roof penetrations.
- Install Rails: Rails are attached to the roof mounts to facilitate positioning, spreading the solar panel load and stress among the roof mounts elevating the solar panels above the roof to allow air circulation for cooling (solar panel performance degrades at higher temperatures).
- Install Ground Wire: The continuous copper ground wire connects to all rail segments and junction boxes to ensure the same electrical reference point and saety.
Solar Panel Installation
- Install Microinverters or Power Optimizers: While microinverters convert DC output to AC per solar panel, the power optimizer conditions the DC output from one solar panel to optimized DC. This later feeds into the central string inverter. Technicians mount these devices to the railing.
- Install Junction Boxes and Wiring (over roof or attic run/wall run options may be available): Electrical junction boxes consolidate microinverter or power optimizer wiring, including ground wiring. Wiring the runs from the junction boxes to the ground level, via conduits, either over the roof or through the attic (for better aesthetics) and down or through the wall (for better aesthetics).
- Install Panels: Solar panels are now laid down on the rails, positioned, and fastened.
- Finish Rails and Install Skirts: After installing all solar panels, the technicians cut to size the end of the rails and install caps. For the aesthetically pleasing look, skirts can also be on the bottom edge of the lowermost row of panels.
- Install Cutoff Switches / String Inverter / Monitoring Devices: Wiring from the roof is then connected to an AC cut-off switch (from microinverters), or a DC cut-off switch, then to a string inverter, and then to AC cut-off switch (from power optimizers). The energy production monitoring and communications device then connects the AC wiring from the AC cut-off switch. The cut-off switches provide a quick, accessible means to disconnect the solar system in emergency or servicing. The string inverter serves the same function as a microinverter but is a single device that centrally converters the AC from the many power conditioners.
MPU (Main Panel Upgrade)
- Prep or Upgrade Electric Main Panel: To connect the solar system wiring from the AC disconnect switches to the electric main panel, the panel needs to carry the additional electrical load and have the physical capability for additional breakers. To accomplish this, the existing panel may need reconfigurations or an upgrade.
- Install Breakers for Solar: For ease of disconnection and safety in case of overload condition or short circuits, the wiring from the AC disconnect switches is connected to the electric main panel via breakers. The electric main panel then distributes electricity to the home or to the electric utility grid.
- City Installation Inspection: At this point, the City or the Agency Having Jurisdiction (AHJ) inspects the installation from electrical, solar, roofing, and general construction viewpoints and approves the installation.
- Install Net Meter: Customers who go solar will now have two means of sourcing electricity: solar panels or the grid. Additionally, any solar-generated electricity which the homeowner does not consume (at time of generation) will go to the grid. Therefore, either LA Solar Group or the Utility carries out the Net Meter installation, letting the Utility know of the “net” amount of electricity they provide.
Interconnection Paperwork Submission
- Utility Inspection and PTO: As the final step in the installation process, the Utility company inspects the installation from solar, electrical, and grid connectivity viewpoints and provides their “Permission to Operate” – “PTO .” After the granted PTO, the homeowners finally turn the system ON.
We hope this solar panel installation guide will give an in-depth understanding of how long it takes to have your solar system designed from designing and engineering to installing solar panels and submitting paperwork.